Saturday, October 17, 2015

Deploying "Quick Resolves" for your Team

12:33 PM Posted by A , No comments
"Our new SCSM Deployment is just too much for simple things."


I spend more time typing all this stuff into an Incident, applying it, closing it because of that stupid background workflow issue, re-opening it, then resolving it than I do actually fixing an issue! Make this less awful!

or

I just deployed Service Manager. It's hard enough convincing team members this is the ultimate solution, but I can't defend how obtuse the entire Incident resolution process seems for things that take less than a minute to fix.

If there is a trend I've seen across SCSM deployment is that generally people implement the Exchange Connector and configure it to convert emails to Incidents because they are easier to work with as opposed to a Service Request...with all those activities. What's more, if you and your team are just getting started in SCSM, Incidents feel easier. You have Classifications, you have Support Groups, you have a lot of things that look and feel like a classic "ticketing" system. But more than likely you're familiar with one or both of the above scenarios.

What can we do? We can Orchestrate ourselves a way out of this and develop Incidents that resolve themselves in a single click without any programming or reverse engineering of SCSM.


PLEASE NOTE: The following (and really this entire post) is merely a suggestion to curb an issue I hear newcomers levy against Service Manager. What's more, we're solving this with the Incident from Exchange Connector scenario. Ideally, you'd implement a Service Request version of this so as to accurately track break/fix (Incident) against what's needed (Service Request). That said, I'm aware what I'm outlining probably isn't the most ITIL friendly thing.

Let's Create a New Management Pack in SCSM
1. Head into Administration
2. Management Packs
3. Create a new Management Pack, for the purposes of this demonstration let's call the management pack "Quick Resolve"

4. Next, let's move over to Library
5. Templates

Before we move on, let's revisit the original two scenarios. What's something that happens on your help desk enough, that takes seconds to solve, you want analysts to enter into SCSM, and later report on? Password resets? Come on, there has to be something! Whatever that is...

6. Create a new Incident template titled the name of the issue you just came up with and save it in your management pack "Quick Resolves". Here's an example of the bare minimum fields you probably want to fill out in this new style of Incident template.


The significance of building an Incident template is sparing your analysts/team members from filling out the same information, every time, for the same type of issue. What's more, by building a template you've just built a consistent "shape of data." That is to say, come reporting time from your data warehouse you can always find these Incidents based on their Title, Classification, Impact, Urgency, Resolution Time, etc.

Hey, wait. You said the Incident would auto-resolve. We didn't do that! LIAR! I GOT YOU!

Time to Move to Orchestrator
Good news, we have a really, really, REALLY easy runbook to build to auto-resolve our Incidents.


1. Initialize Data


2. Get Relationship (Runbook to Incident)


3. Get Incident
SC Object Guid equals Related Object Guid from Get Relationship (Runbook to Incident)

4. Get Relationship (Incident to Assigned To)
Object Guid equals SC Object Guid from Get Incident

4a. Link between Step 4 and Step 5
Exclude, Relationship Class does not equal Assigned To User

5. Get Assigned To
SC Object Guid equals Related Object Guid from Get Relationship (Incident to Assigned To)


6. Create Relationship (Set Resolved By from Assigned To)
Since we want to give analysts credit for working Incident when it comes to reporting, we need to make sure we mark them as the Resolver of the Incident.


In the above, we're defining...
Source Class = Incident
Target Class = Active Directory User
Relationship Type = Resolved By User
Source Object Guid = SC Object Guid from our original "Get Incident" activity
Target Object Guid = SC Object Guid from our recent "Get Assigned To User" activity


7. Format Incident Created Date (add 5 minutes)

I added five minutes because my assumption here is that the Incident your analyst is working on is taking less than 5 minutes to resolve. Maybe you want to make this window even tighter? Your call. The point is, we're getting the created date of the Incident and making up a Resolution Time to be set. Again, we're defining a consistent "shape" to our data.

8. Resolve Incident

Here you'll notice I set three fields
  • Status = Resolved (duh)
  • Resolution Category = Walked Through Knowledge Article (because if you think about it, if your analysts are resolving stuff this fast shouldn't there be a knowledge article you are walking people through? Something you are educating someone on? Aren't by definition these style of Incidents a user training issue?
  • Resolved Date = The Created Date/Time + 5 minutes. Specifically "Format Result" from the previous format date time step


Check your runbook in
Sync your Orchestrator connector in SCSM


Back to Service Manager!
With your runbook synced into SCSM, let's build a Runbook Automation Activity Template from it!

  • Library -> Runbooks -> Find your Quick Resolve runbook we just built.

Upon selecting it, in the top right hand corner choose "Create Runbook Automation Activity Template"


What management pack are we going to save it in? How about the one we created when we started this whole thing?! Perfect!

Once you're in your new template, give it a name, description, classify as necessary. But more importantly make sure you have "Is Ready for Automation" checked off.


Next, head into the Runbook tab -


The first step in our runbook we created a parameter called "ActivityGUID". Here you can see that very same parameter, but we need to map it to Object -> Id to ensure the data is passed correctly into Orchestrator when the Incident is saved.
Hit OK and save yourself out of this window.
FINALLY...
Go back to your Incident template that you originally created for this "Quick Resolve" style Incident.
Head into the Activities section of the Incident, hit add, and add your recently created Runbook Automation Activity.
Save yourself out of the Incident window.
Done
So now, you've built a really awesome, quick way to work Incidents in your system. Now it's possible to analysts to choose "Create Incident from Template" and pick the IR Template we just created (runbook and all) OR they can Apply Template to a pre-existing Incident (aka something an employee submits that you have a "quick resolve" for so as to continue to set a consistent shape to your reporting data).
The runbook will only engage once the Incident has been saved/committed into the system. Which means the only thing the analyst is filling out two fields, Affected User and Assigned To! Now analysts have but a single button to push to create Incidents and get credit for them in downstream reporting! No more weird background workflow issues preventing analysts from creating, saving, and resolving. They can resolve in one click, the OK button!
It goes without saying, you can copy and build multiple types of this Incident style. Perhaps you want to do one for everything thing that isn't a Service Request yet (which is to say, everything you don't have a process for yet within your organization.)
Wait, one last question. Why did you use Assigned To? Why not Created By User? Wouldn't that be more reliable? Wouldn't that mean analysts don't even have to fill themselves in as Assigned To?

Don't forget the scenario we designed for... employees email Incidents into your help desk. So before you go flipping this runbook trying to make it easier, remember that if an employee emails an Incident in they are the Created By User. So unfortunately, that is probably a less than ideal reporting issue to get around.

Sunday, September 13, 2015

Malware Flagging and Reporting - SCCM, SCOM, SCSM, and SCO (part 2)

2:00 PM Posted by A , No comments

I promise this isn't going to be nearly as bad as the Employee Management thing.

In this post, we'll assemble the Orchestrator runbook that...
  1. Converts the SCOM Alert/SCSM Incident to a Parent Incident.
  2. Queries your SCCM database for Malware Infected computers
  3. Creates Child Incidents that get attached to the Parent Incident
  4. Adds the SCCM context to each child incident such as Affected CI, malware type, severity, etc.
  5. Define the Primary User of the Computer as the Affected User of the respective Child Incident
At the conclusion of this post we'll have SCCM alerts, that trigger SCOM alerts, that in turn create an SCSM Parent Incident, that triggers an SCO runbook that creates Child Incidents for each infected computer. If you missed Part 1 that establishes the majority of this setup, you can go back to it here. Otherwise, let's get on with it!

Get the "SCORCH Dev - SQL" Integration Pack
You'll need to get a Codeplex SQL Integration Pack for Orchestrator. I know you can write SQL queries out of box with SCO, but their results are less than ideal in terms of Orchestrator flow. This version will spit out the returned dataset in a much more consumable fashion for downstream activities. You can get this IP here.

It also should be mentioned like many add-ons and tools in the System Center (Orchestrator) space; there are a host of options and as such, there a lot of different IPs that let you work with SQL. I'm personally a fan of this one. It's free, it's simple, and it gets data the way I've come to expect in Orchestrator. If you have another one you prefer (or have paid for) go ahead and use that.

NOTE: Once imported, you must deploy the IP to all SCO management servers, runbook servers, and any designers where you want to build (and in turn, potentially execute) from. Otherwise you must force the execution of the runbook on a particular server via the runbook's Properties -> Runbook Servers tab.

WHY: Presumably you have more than one Orchestrator server in the environment and have not changed where the runbook executes - Orchestrator will execute the runbook on an available server in the SCO group. However before execution (as in before you see it in Log or Log History) SCO will verify the IP exists on all available servers. If the IP isn't found the runbook will never execute and there will be no recorded Log History of it ever occurring. However you will see an error in the Events view about how "Resources could not be found."). Not knowing this would probably lead you to a fair amount of frustration as SCSM invokes the runbook and SCO has no recorded history of it ever occurring.

Building the Runbook
1. Initialize Data
2. Get Relationship (Runbook to Incident)
3. Get Object (Incident)
4. Update Object (Incident - Is Parent = True)
5. Run .NET Script (Get the Current Date/Time)
6. Format Start Date/Time (Start Time)
7. Format End Date/Time (End Time)
8. Run SQL Query
9. Get Object (Windows Computer)
10. Get Object (Active Directory User)
11. New Object (Incident)
12. Create Relationship (Incident has Affected CI)
13. Create Relationship (Child Incident has Parent Incident)
14. Create Relationship (Incident has Affected User)

Here's a screenshot of the entire runbook


1. Initialize Data


2. Get Relationship (Runbook to Incident)


3. Get Object (Incident).
SC Object GUID Equals Related Object Guid from Get Relationship (Runbook to Incident)


4. Update Object (Incident)
Object GUID from "Get Incident"
Is Parent = True


5. Run .NET Script (Get Current Date/Time)

I feel like this is the step where I'm bound to get someone saying "RIDICILOUS! NOT DOING IT!" - the SQL query we're going to execute against SCCM I need to have some kind of bounds. The most logical (to me at least) are a window of time where the malware was discovered by SCCM's Endpoint Protection. That said, a Run .NET Script was introduced into this runbook to get the current time, minutes into the past, and minutes into the future. For the purposes of this example you can see I said "10 minutes in the past" and "10 minutes into the future". Also, I know you see "20" there, but notice that the second line of the script updates the "currentDateTime" variable. You could just as easily change these values to a smaller window of time.

Finally, these values are published back out to the Orchestrator data bus so we can use them in our SQL query.


The two following activities take the outputs of the PowerShell script and format them into a time suited for our SQL Query. Both of these activities use the following Input and Output formats.
6. Format Start Date (Start Time)
7. Format End Date (End Time)


8. Run SQL Query
You can run the query with or without a global config. Personally, I like the global config route as I may want to use this connection in the future. Either way, you have to define a connection to your SCCM server's database and instance and your SCO service account will need Read on the SCCM DB. Here's the setup for the Global config and how it should look.

This is the syntax of what your Global Config for the SQL IP for your SCCM DB should look like.


Then here's the SQL query you'll use in the Run SQL Query Activity. Don't forget to update the WHERE statement to include your Format Result/published data from the two previous time based activities!

SELECT        DISTINCT dbo.Computer_System_DATA.Name00 AS Computer, dbo.Users.UserName, dbo.EP_Malware.ThreatName, dbo.EP_ThreatCategories.Category, dbo.EP_Malware.Process, dbo.EP_ThreatSeverities.Severity
FROM            dbo.EP_Malware INNER JOIN
                         dbo.Users ON dbo.EP_Malware.UserID = dbo.Users.UserID INNER JOIN
                         dbo.Computer_System_DATA ON dbo.EP_Malware.MachineID = dbo.Computer_System_DATA.MachineID INNER JOIN
                         dbo.EP_ThreatCategories ON dbo.EP_Malware.CategoryID = dbo.EP_ThreatCategories.CategoryID INNER JOIN
                         dbo.EP_ThreatSeverities ON dbo.EP_Malware.SeverityID = dbo.EP_ThreatSeverities.SeverityID 
WHERE        (CONVERT(datetime, SWITCHOFFSET(CONVERT(datetimeoffset, dbo.EP_Malware.DetectionTime), DATENAME(TzOffset, SYSDATETIMEOFFSET()))) > 'formatResultStartTimeGoesHere')
                        AND (CONVERT(datetime, SWITCHOFFSET(CONVERT(datetimeoffset, dbo.EP_Malware.DetectionTime), DATENAME(TzOffset, SYSDATETIMEOFFSET()))) < 'formatResultEndTimeGoesHere')

And what exactly is this SQL query getting you ask? This SQL query returns the Computer name, the Primary User(name), Malware Name, Malware Category, Malware Process name, and the Malware Severity. We also take the time formats and ensure they are converted from UTC to your local time zone. Now if you are really involved with SCCM you may have also immediately realized...

Wait a second. There is a native SCCM Activity for Orchestrator that lets me execute queries. Stored queries in SCCM no less! Why am I not using that?

Well...truthfully there is no good reason. You absolutely could do that. The thing is that has to be written in WQL which I'll be honest - is a skill I need to work on. As a result. It means you either "convert" my SQL query to a WQL query you store in SCCM or execute SQL against the DB from this IP. As you can see, I clearly opted for the SQL route. So if you are up for some conversion, go for it and leave a comment and help make this thing more awesome!

Credit goes to Robin's CM IT Blog and the post "PowerShell: Get SCCM Malware Detections to CSV file" as providing the basis for this query.


9. Get Computer
There are a few ways you can do this match. Depending on what your SQL result returns for computer names you can use one of the following properties and of course your choice of Relation field. Although I can't think of reason you wouldn't want to use "Equals" here.

Display Name, DNS Name, etc. equals fieldXX from your SQL query


11. Get Primary User
UserName equals fieldXX from your SQL query. I know I don't have any filters in the screen shot BUT the same exact rule/logic from the previous step applies. So, you'll need a filter!

You'll also notice something we didn't do here and that's say/build something like "Get Relationship from Get Computer to Active Directory User." We just as easily could have as presumably you are syncing SCCM into SCSM - however, depending on the last time that connector ran the "Primary User" of a computer in SCSM maybe stale. As a result, this is why in the SQL query we pulled the Primary User directly from SCCM and are doing a match inside of a single activity within our runbook. That way we obtaining the most recent data possible.


12. New Object - Create Incident
Here's the properties I'll be setting for the Child Incidents that get created for each computer. Obviously pick and choose what you need. For example, if you already set the Classification Category within the SCSM Incident template there is no reason to set it here.


In the Description of our Incident, we can consume the fieldXX properties from our SQL query. So we can insert the Infected Machine name, Malware Type, Path, Severity, etc.


13. Create Relationship (Attach Computer to IR)
If you've never used Create Relationship, it may take some getting used to. But it makes a great deal of sense once you have. What's the source class/point of origin? An Incident. What do we want to do to that Incident? Attach a Windows Computer (Target Class). What is the Relationship Type between these two Classes? SCO only lets you pick possible relationships! Finally, define what the GUIDs are for each of these. The Source Guid is our Incident. The Target Guid is our Computer.


14. Create Relationship (Attach IR to Parent IR)
This one may feel weird if you've never defined this kind of relationship. Source and Target are Incidents. The Relationship Type is "Has Parent Work Item". Notice that the distinction between child and parent is made in the definition of these items Guids. My Source Guid is the Incident I created within the execution of this runbook. The Target Guid is the Incident that is the inception of this runbook's execution/the parent we defined upstream earlier.


15. Create Relationship (Set Primary User as Affected User)
Source Class: Incident
Target Class: Active Directory User
Relationship Type: Affected User
Source Object Guid: SC Object Guid from "Create Child Incident"
Target Object Guid: SC Object Guid from "Get Primary User"


That's That.


"So why did you make the SQL query the way you did? Wouldn't I then only have a single Parent Incident with a single Child?"


Sure. What about when the Malware Alert goes off for "Multiple Malware Detected" from SCCM? Etc. Etc. I'd say remove the DISTINCT portion of the query and then modify it to only get the duplicate machines returned from the query.

The point is - I absolutely recognize this solution isn't perfect. I recognize that parts are clearly open to interpretation given everyone's environment. If anything it introduces the need for at least one or two more child Runbooks that flank perhaps based on the Title of the parent Incident. Perhaps you've REALLY customized your SCCM malware alerting. You'll have more than just a single scenario to account for! More than anything, I hope this serves as something you can build off of and personalize for yourself and your environment. Perhaps the following example is the first runbook that the Incident executes? Or maybe it only converts to a parent in the Multiple scenario and not the single scenario?

More ideas? Ways to improve? Good! Seize the day and build!

...or perhaps it means the SCCM team needs to update their management pack for SCOM so it just does all of this magic for us? :)


In the next post we'll go over the SCSM SQL query for your data warehouse to start building reports to get things like...
  1. Which Affected User's get the most malware?
  2. Which Affected User Departments get the most malware?
If you are versed in your SCSM DW these reports may sound incredibly obvious given we have defined all the data we need too. If not, I'm writing the post!

Saturday, September 5, 2015

Execute Native Powershell Version 4 in Orchestrator 2012/2012 R2

2:48 PM Posted by A 3 comments


Yeah. No joke. That isn't a typo.

Let me repeat that because it bears repeating.

You can run Powershell v4, 64bit, natively in Orchestrator 2012.


NO TUNNELING.
NO SESSIONS.
NO MORE RETURN VARIABLES AS OBJECTS FROM A REMOTE SESSION NONSENSE.


How? Lies you say?!

Will Udovich (of Cireson) and his finding of a SINGLE blog on the internet from "TechGuy" Michael Seidel mention this little registry hack. One blog? ONE BLOG?!?! Grab anything you can that makes loud noises and make sure EVERYONE knows about this.


That's it! ONE FREAKING REGISTRY KEY!!! Now Run .NET Script will let you execute things like "Get-ADUser" natively!!!

I could not believe what I was reading until I fired up my development environment, added this registry key and watched it work exactly like any one would expect it to.


Also, in the event it wasn't clear...my reaction to all of this can be summarized by the opening gif.

Malware Flagging and Reporting - SCCM, SCOM, SCSM, and SCO (part 1)

2:47 PM Posted by A , No comments
Yeah. Buckle up.

Alright. So I had this idea and given how much all of the System Center components rely on one another it stood to reason I could execute this idea of mine relatively simply. OH HOW WRONG WAS I!

Scenario: Configuration Manager (SCCM) does malware reporting/alerting (sort of). If you've configured alerting in SCCM, it sends out an email from spoofed/fake email address out to select parties you've determined. But, you also leverage Service Manager and...
  1. Really would rather have malware get flagged as an Incident and assigned out to someone to investigate or
  2. You want it in SCSM so you can continue to develop and consume all of your reporting from a single point or
  3. You want an Incident as it relates to a Configuration Item or
  4. You want to open Incident on behalf of the Primary User of the PC
All of those things are valid reasons I think you'd want to start piping this through SCSM. So I thought to myself...

"Well. This sounds easy. I'll just get the SCCM management pack for SCOM, hook 'em up, forward alerts from SCOM into SCSM. Done."

Here's the problem though. SCCM has this rule (and the following example applies to all of them) called "Malware detection alert: Malware found." and in SCCM it monitors a collection, and the SCCM alert contains the PC and malware type. When you get SCOM hooked up to monitor this alert, when the alert forwards from SCCM to SCOM. The SCOM alert description says "Please see the Configuration Manager console for more details." Which means when this gets forwarded to SCSM the Incident description says "Please see the Configuration Manager console for more details." And what's worse? Their is only ONE Affected CI in the SCSM Incident and it's your SCCM server(s).

So I'd say this is less than ideal. Because now all I've done is add unnecessary process and if anything require someone to do more work. I want ALL THE THINGS in Service Manager! Here's the harder news to digest - this isn't an accident. SCCM designed the management pack like this. So if anything it's probably a feature request that I hope this blog post drives them to implement. Alright. That's probably wishful thinking on my part.

I THINK NOT!
So before you simply give up and move on. What about this idea...

SCCM forwards alerts to SCOM. SCOM forwards the Alert into SCSM. The SCSM Incident template for this contains a SCO runbook that executes a SQL query against SCCM. The result set is the machines infected. The runbook converts the Incident to a Parent and creates Child Incidents for each infected computer.

And that's exactly what I did. No time to waste. Let's build it.


Configure SCCM to forward Malware Alerts to SCOM
If you haven't already done so. You'll need to get the SCCM management pack for SCOM installed. Then you'll need to get it configured to correctly poll these alerts.
  1. Obviously - import the management pack into SCOM
  2. Make sure you have SCOM agents deployed to SCCM server(s)
  3. Most importantly - Make sure you have enabled Agent Proxy under the Security tab on each managed SCCM server.
    1. Basically, you are saying the agents can act as a proxy (or if you prefer a "front") to SCCM managed devices. It allows SCOM to see through SCCM to it's "managed things".
Once you've done that, you may have to let SCOM/SCCM bake awhile before you start seeing the SCCM alerts show up as Not Monitored alerts inside of the SCOM view "Alerts from Configuration Manager". Once they appear though, you may wonder...

"So why aren't they monitored? They are all green. What gives?"

The reason they aren't monitored is because the SCCM management pack by default has almost everything disabled by default.

"That's lame. Why would they do that?"

Think of it this way. If it was all on by default, SCOM would vomit everywhere. If this is the first management pack you've experienced where everything is off by default your reaction may now be...

"Oh. Well. Yeah. That does make more sense."

 So how do we start monitoring these things?

Configure SCOM to listen to SCCM
Quite simple. Create an override!

1. Right click on the SCCM alert you want SCOM to monitor
2. Navigate to Open, and then Health Explorer for Alert You Selected
3. Now (left) click on "Entity Health - Malware outbreak alert..."
4. Now click Overrides
5. Select "Override the Monitor"
6. Select "For a Specific Class of the Object: ConfigMgr Alert: Malware Alert"

You should now seen your collections you monitoring in SCCM. Select the collection you want SCOM to poll from SCCM.

Finally you are placed on the Override screen...


Here you can see the Default Value for Enabled is False and we are setting the Override value to True.

If you haven't done so already in your initial setup of the SCCM management pack, now would be a good time to create a SCOM management pack to store all of your SCCM modifications. Once you've done that, save this override in your new Unsealed SCCM Management Pack for SCOM.

Repeat this process of enabling rules and saving them to your Unsealed SCCM Management Pack for SCOM for as many things as you want SCOM to monitor from SCCM.


Create a SCOM group for your SCCM Alerts
Next, let's head into the Authoring section of SCOM. Select Groups and let's create a new group called "Configuration Manager Alerts" we'll save it of course in our recently created Unsealed SCCM Management Pack for SCOM. This way our overrides and groups are stored in the same place.

Now while you can get fancy with some Dynamic membership. I'm going to use Explicit Membership and grab my Malware Alerts. Just go to Add and under the default scope of "Object" just type Malware and search.


Then just go ahead and add the rules you want (and more importantly overrode to Enabled True).


Add a new Rule to your SCOM/SCSM Subscription
Now you can open up your SCOM subscriptions and open up your SCSM connector/forwarder.
  1. Create a new Subscription
  2. Unselect all Groups and then select the one we just created - Configuration Manager Alerts
  3. Leave "Forward alerts from all targets automatically..." the default option selected.
  4. Hit Next
  5. Leave the default SCOM criteria selected
  6. Done
Now, since this is just the initial walkthrough it goes without saying (and I'm typing so that works) that you can always go back, modify, and tweak these rules beyond belief. For the purposes of this walkthrough I'm just keeping things simple.


Create the SCSM Incident Template
Next let's move into Service Manager to create an Incident template so that when our Alert gets forwarded from SCOM into SCSM we can consistently apply the same Incident. More importantly, when we go to start building reporting we have a consistent shape to our data.

1. Head into Library
2. Go to Templates
3. Create a new Incident template
4. Store the template in...well...either a management pack you already have and are keeping all of your Incident templates in or create a new Management Pack to store it in. Anyone versed in SCSM will appreciate the thought that goes into grouping your Templates into properly defined management packs. So Step 4 here is a bit open ended since everyone's SCSM environment/administration is always just a little bit different.

This new Template we'll want to assign a few things out of the gate
1. Impact
2. Urgency
3. Classification
4. Support Group and/or Assigned To - because after all that's kind of the point of this entire post of mine!

Save it. You're done in SCSM...for now.


In the next post (available here) we'll go over the crux of this entire thing...
  1. Creating the Orchestrator Runbook that converts the Incident to a Parent Incident.
  2. Queries your SCCM database for Malware Infected computers
  3. Creates Child Incidents that get attached to the Parent
  4. Adds the SCCM context to each child incident such as Affected CI, malware type, severity, etc.
  5. Define the Primary User of the Computer as the Affected User of the respective Child Incident


System Center Icons obtained from System Central Central. Here's the direct link.

Sunday, August 2, 2015

Service Manager - Employee Management, Part 4

12:00 PM Posted by A 1 comment
I know. I know. Super overdue on this one.
NOTE: Times have changed and so have my opinions. Please read this first - http://scsmmercenary.blogspot.com/2016/02/in-defense-of-class-extension-vs.html


No time to waste. Let's build that Service Request Template!
The first thing we'll have to do is create a Service Request Template of the type "Service Request, Human Resources" aka the class we created when we originally devised this management pack of ours. We're doing this because need all of our custom properties available to us and to Orchestrator. To do this, we're going back into Service Manager and heading to the Library menu.


Select the Template options and then on the right hand side hit "Create Template". You can call the template whatever you'd like but since I plan on using this for a bunch of other HR style/AD changes I'm going to adopt the naming convention of Employee - Action. So this in case, Employee - Create. The class again is going to be "Service Request, Our Custom Class Name." Just hit browse and start typing "Service Request" you'll see two options. The stock Service Request class and our new custom one. Finally as is standard within the SCSM/SCOM universe where are we going to save this template? It needs to be saved in an Unsealed Management pack. If you've already created one where you are storing Lists for this management pack go ahead and just choose that one or if you prefer, create a brand new one just for storing these types of templates in. Then hit OK.

The new Service Request form will open up along with your custom new tab. On the General tab, as is the norm for Service Manager there are a few fields that are mandatory that we need to set. Now we could set them here or in the Request Offering we provide the values so that on Create/Submission of the request those fields get set. Given this is our first pass at this, let's remove any minor issues by setting those fields now. Now, while it isn't a mandatory field I suggest setting the title of the request to "New Employee" or "Onboard Employee" - the point is, provide some context here.

Alright. I guess will. I have to ask, why? It isn't mandatory.

So, if you have some basic notifications workflows setup in Service Manager...you may have one that says "When SR goes from New to In Progress - notify the Affected User their SR has been created." When that notification goes out, you may want to say in the body of the email that "Hey, thanks for submitting Create New Employee" or something. Once you have said values defined in the template, hit Apply. Yes. Apply. I want to leave the form open because...

Has Service Manager synced Runbooks from Orchestrator yet?
In the last post, we created a runbook that would do the actual creation of our new user. In order to call that runbook the following things must be true -
1. The runbook needs to be "Checked In" within Orchestrator
2. Service Manager must have run a sync with Orchestrator
3. Assuming SCSM had a successful sync, in the Library -> Runbooks tab you should see the runbook we created

If you see your runbook in the runbooks list, congrats! If you don't double check steps 1 and 2. If it is checked in the next questions are...

1. Has the SCSM/SCORCH sync been setup in the Administration -> Connectors tab?
2. When was the last time it successfully ran?
3. Did it run, but with errors?

I will tell you that if you've never set this up or it runs with errors, almost 10 times out of 10 the issue is you haven't granted your Service Manager Service Account, Administrative permissions on Orchestrator. This of course assuming your SCSM service account is the account you defined in the connector to be used. If it's another account, then that account needs admin permissions on your Orchestrator instance.

Build the Runbook Template
In the runbook list, find your Employee Create runbook. Select it and on the right hand pane click "Create Runbook Automation Activity". Service Manager will pop a brand new window similar to how you've seen other activities get created (such as Review, Manual, etc.) Go ahead and name your Activity the same name of your runbook. Yes, it can be different but to keep things simple within this entire example of mine call it the same thing. Again, you'll have to choose the management pack to save it in. I suggest the unsealed Human Resources management pack you are keeping lists and the just saved Service Request in.

Similar to the Service Request template, we have some fields to fill out. Give this Runbook Activity a title and description.


I did two other things here, defined the area and stage. Why? Well to me it just seems good practice to define as much as possible from the outset because when it comes to Service Manager SQL reporting I can count on these fields having data.

Is Ready for Automation. You checked that. It's unchecked by default. This sounds important.

AND IT IS! It is unchecked by default but you have to check this off in order for Service Manager to call Orchestrator to execute this runbook. It's a very, very, very common thing to accidently look over. That and...

Now head over to the Runbook tab


Here we see the name of the runbook as you defined by Orchestrator in the un-editable "Name" field. We also see DING!!! ActivityGUID. Remember ActivityGUID? It's the thing we created in the first step of our Runbook's "Initialize Data" Activity. You may have been scratching your head the whole time thinking "How the hell does this runbook start?!" Welp. This is how. The Service Request on create is going to feed that runbook this information.

1. Click Edit Mapping
2. Select and expand the "Object" tree
3. Select "ID"

If you think on this just a bit longer this means we could have called ActivityGUID anything we wanted. We could have called it "Magic Sauce" because these products (SCSM/SCO) don't care about the name here. We're calling it ActivityGUID for our own readability in the future. We know that the runbook receives the Activities GUID property.

For those who aren't familiar, GUIDs are unique identifiers. In fact they are Globally Unique Identifiers. Using GUIDs we can count on dealing with a unique, single object. Remember the Runbook and how we always chose "Related Object GUID" ? Making more sense? Eh? EHH?!

Alright enough reflection here. Make sure "Is Ready for Automation" is checked off and you've set the ActivityGUID property to the above. Hit OK and close this form out.


Back to that Open Service Request Template
Now go back to the Service Request template we still have open. Within the Activities tab, hit the plus button.


With the menu that pops open, we're able to add Activities into our Service Request. Having just created our new Runbook Activity, go find it/search by the name you gave the RB Activity and add it into your Service Request. Once you've found it and hit OK, it pops up the form.

If you think about this, I'm sure the architecture choice was something like...

"Build the template to whatever you want, and then make final specific choices of the instance of one of those wherever you place it."

For example, I could foresee someone creating a RB Activity having "Is Ready for Automation" unchecked by default, but when placing it in your Request checking it off. Or perhaps making the inputs to the runbook general and never defined until you place it in the request.

Anyway. Hit OK and drop this runbook in your Service Request. Then hit OK and save your Service Request template.


95% done with this whole thing. I promise.

The final step. Build the Request Offering.
With the template created, we can now build a Request Offering. This part in comparison to whole thing is the easy part. This is our presentation layer on the portal that is going to take user inputs and map them to our custom properties, execute our custom runbook, etc. This is the part that makes this whole thing look simple.

The other thing is that it's crazily self explanatory. So I'm going to go over the parts that affect our custom request and runbook.


In the User Prompts section we define...well the information we need to solicit from an end user entering information the form. Now I've defined a lot more than our basics hence the slider bar in my screenshot. But that doesn't change anything.

I've asked for the new hire's first name (required), middle name (optional), last name (required), job title/position name (required), department (required), and their manager.

I want to draw your attention to the last two. Department and Manager. As you'll recall in step 1 of this series I made Department a list and I made Manager a relationship. So for department I simply select "MP Enumeration List" and pick the list in Service Manager where I'm storing my Departments (which to bring this full circle) is why I saved Departments in a list as it means I don't have to go into and edit this request every single time I need to add a Department. I can simply go to "Lists" and add/remove. Plus it means multiple Request Offerings can leverage the same list so I only have one place to make edits. Finally, since Manager is a relationship type within the request I need to get a list of objects within the Service Manager database. But a very specific object type. I need Active Directory users that are managers.

Easy. I got an AD Group for that.

WRONG! And I'm not saying that to be harsh. I'm saying it because it's impossible within Service Manager to query an AD group because that kind of relationship isn't kept in Service Manager. So how do you do it? How do you get All Managers within your organization given this caveat in Service Manager?

How about all Active Directory Users whose Manager property is not null? So how do you do it? Fortunately, a previous blogpost of mine explains this! You can check it out here.

Let's wrap this up, NOW!
Finally. Map the User Inputs to your custom properties.


WABAM! YOU'RE DONE!
Right after you save and publish it :)


As no doubt you can see, there are a lot of steps to this entire process but holy crap are they worth it. Because guess which department isn't manually creating Active Directory accounts again?

Well. Yea...wait. I have more stuff I want to add! I need more properties!

Then go for it. You have the management pack, just add a new property, seal it, import it, you're good to go.

Ok! But, I need approvals! I want someone to ok a new hire!

No sweat. Go back to your Service Request template add a Default Review Activity and place it before the runbook activity. Then give it a name, add some reviewers, etc.

Holy crap that makes perfect sense.

I'm glad it does :)

Wait a second. I could use this exact same management pack for updating employee information, terminating employees, extending end dates on accounts. Right?

Yes you can because you built the management pack to do it! Just build a new Service Request template and Request Offering for those things and you're good to go.

Wednesday, July 29, 2015

Microsoft Patches Biggest "Feature Request" with Service Manager 2012r2 UR7

9:03 AM Posted by A No comments
I could not resist using this image

Here we are at UR7 for Service Manager and for better or worse, sarcasm, and negativity aside - it looks like Microsoft has finally seen fit to improve the core product and not focus on just the data warehouse. To what am I referring? "Click Apply and Die".

If you've been working in Service Manager, no doubt you've eventually run into the issue where you create some type of Work Item, hit apply, make some changes, hit apply again and then Service Manager vomits...

 
Just reading the sentence is simple enough, expanding for more information and you may feel you need as though you need to be working on the development team for SCSM to understand what's going on. What's more, if you've never seen the error (or as I'm assuming, you've seen it repeatedly) - eventually you start to realize that the error occurs when you've made a change, out of box SCSM workflows engage altering the state of the work item, and when you try to update the error occurs.

Starting with UR7 for SCSM 2012 R2 - the error is no more! Well. Sort of. I'll be honest, I'm fine with the error so long as I know just what exactly changed...

Which you do now! Way to go UR7! Want to know how I really feel? Scroll to the top and stare at the image longer. Ok. But that's just a text box. It tells me what exactly changed which is useful. I wish I had a better idea that it was happening...


WABAM!!! THAT'S HOW YOU MAKE SERVICE MANAGER ROCK MICROSOFT!

Alright. That...that is pretty cool. To be fair, it should have just been there on day 1.

Hey. Easy there. You sound more cynical than me. Only kidding. I'm with you! If you said the above while witnessing the new UR7 functionality you are not alone! This is one of those things that seems like it should have just been there since release. At least this is something they saw fit to just up and resolve (no less at the SDK level!) and not eschew to vNext. As a result, this doesn't jeopardize any custom workflows you may have created, that you may have purchased from 3rd parties, so in other words...brilliant!

Also an interesting really minor update they made in UR7 -

If a User changes from having a manager in AD to NOT having a manager, the relationship is not updated in the CMDB. With UR7, SM will sync these changes too.

As you may recall, I published a post some time ago about creating Direct Report style requests and in it apart from the two to three custom management packs you'll have to develop to achieve it the one that now I technically have to recount is Travis Wright's blogpost from 2009 and using that as a reference I said "this is how you can get the enabled property of users into Service Manager." Technically speaking, with the above fix you don't have to leverage the Enabled property on said Service Requests anymore. HOWEVER! It doesn't mean that the enabled property within Service Manager can't be useful elsewhere! Maybe reactivate disabled accounts? Ehhh? Ehhh?!?

Seriously. Microsoft. Guys. Girls. SCSM Product Team. Whoever on that development team over there. Way to go and knock out what only can be referred to as an "essential." If this is any indication of your new CEO's company then I politely ask...

Please do not stop

Monday, June 29, 2015

Hello Affected User - I Fixed Your Incident is it OK if I resolve? Hello? Are You There? Anyone?!

9:38 PM Posted by A , 1 comment

I'm not even going to waste time with an introduction, let's just get to the scenario.

You're an incredibly customer service oriented manager/individual/analyst. You follow up with all of your Affected User's once you've resolved their Incident. But before you mark it as "Resolved" in Service Manager you may want their sign-off either via Email or verbal. As such, you may spend an unreasonable amount of time trying to get a hold of the Affected User once you've solved their issue for said confirmation. 


Now I know what some of you are thinking, "Whatever. I'm marking the Incident as Resolved and moving on. I'm not going to waste my time on contacting them. They'll call back if they are really having an issue." Which, sure. That is a valid approach. The cynic in me absolutely agrees with you. However the half of me obsessed with customer service says otherwise. Because if anything, I feel as though I'm being arrogant in my "resolution" I'm assuming that since the Affected User isn't talking I can just mark it as resolved. I really want to show the employee community a lot of love and care. After all they are my customers and I do have to work with them. Plus, I especially don't like this from a reporting stand point either. If anything I'm building some "false" data. Sure I could select the Resolution Category as maybe something more custom like "No Response from Employee" but that the only puts further onus on analyst making a new correct decision and not possibly skewing data again. Blehhh...

Ok, here's my idea. Create a new Status like "Pending User Confirmation to Resolve" underneath your "Pending" status (sure it's a bit wordy, but I'm just trying to be descriptive here). Once an Incident is set to that status, have Orchestrator scour Incidents every day at some specific time in that specific status daily looking to see the last person to update the Incident. If it's anyone but the Affected User, send the Affected User an email asking if the Incident can be resolved. After 5 days of inactivity, begin emailing the Affected User and the Affected User's manager (as defined by Active Directory). Perhaps after 10 days of inactivity, it goes to the Affected User, the Affected User's manager, and then their manager or maybe your IT department's Service Desk manager, etc. etc..

Wow. That seems a bit email spammy. I mean...I get it...but...hrm.

Make no mistake, I'm not saying you should do this. I'm not saying you should try to convince your organization adopt this policy. But what I am saying is "Here's exactly how to do this with Orchestrator and PowerShell if you were the least bit curious so follow along and modify to your needs if you'd like!"


Step 1 - Create the Orchestrator Runbook
As per usual, I'm the first to admit that I'd rather do everything with PowerShell. I know Orchestrator is awesome n all, but the "looping" of activities based on how many times the last one ran...it just gets annoying sometimes. Not only that, this is a scenario where that is going to happen a lot and an unknown amount of times. So I'll do what I can in Orchestrator and then off to PowerShell!


 As I said, the idea here is that...
  1. Everyday at 10am
  2. Get All Incidents with a status of "Pending User Confirmation"
  3. Get the Relationship between the Incident and the Affected user
  4. Get the Affected User
  5. Get the Relationship between the Incident and the Assigned To User
  6. Get the Assigned To User
  7. Create a text file on the Orchestrator server in something like c:\scsm\automation\requestResolutionConfirmation\$irNumber-$affectedUserUserName
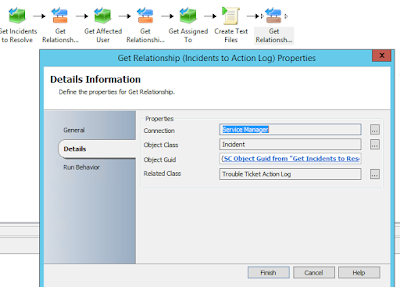
  8. Get the Relationship between the Incident and the Trouble Ticket Action Log
  9. As long as the Action Log has items...
  10. Get the Entire Trouble Ticket Action Log
  11. Format the Trouble Ticket Action Log "Entered Date" to a friendlier format like "05-21-2015"
  12. Append lines to the text files that were created using commas to separate values. Each line will look like...
    1. EnteredDate,LogGUID,EnteredBy,AssignedToUserName
      1. You don't have to use the GUID, but I am for the sake of building so you can see you are in fact generating unique Action Log items within the entirety of the Action Log text file. Not to mention, you'll just ignore them in the downstream PowerShell parsing.
  13. Using a PowerShell script file, we're going to...
    1. Read the entire directory of Action Logs
    2. Sort the Action Log's text file's contents by most recently entered date (when they get appended they aren't in order. I can't figure out the reason why Orchestrator picks the order it does). When sorted the most recently entered item will be the first line of the text file.
    3. Parse each Action Log text file's first line (which would be the most recent Action Log item and will get you the last entered date and who entered it)
    4. Use a Get-ADPrincipalGroupMember to enumerate the Enter By user's groups and figure out if any of them are a match to a SCSM analyst group as defined in your Active Directory
      1. If they are (which means the last comment was left by an analyst) then email the Affected User
  14. Finally, delete all the text files created several steps ago
 
Alright. Lay out your Activities
Get all the activities out on your runbook canvas and wire them up in the following order like the above picture
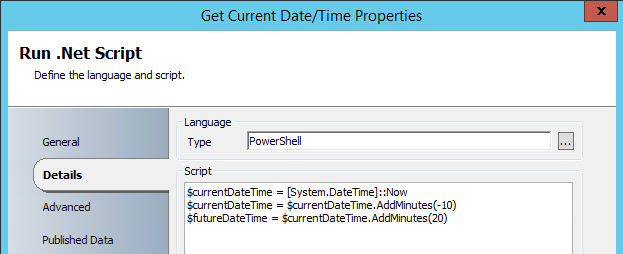
1. Monitor Date/Time
    a. optional: Check Schedule
2. Get Object
3. Get Relationship
4. Get Object
5. Get Relationship
6. Get Object
7. Run .NET Script (PowerShell)
8. Get Relationship
9. Get Object
10. Format Date/Time
11. Append Line
12. Run .NET Script
13. Delete File
 
Deep Breath. Build Time.
 
 
So the first activity is the Monitor Date/Time object and I've set it to 10am. That way every day this runbook will kickoff at said time. Simple.
 
I don't want every day. I just need Monday through Friday or some custom defined set of days for my organization.

No problem and fair point! If you want to do this, we'll need to make the step immediately following this a Check Schedule activity. This activity will then validate if it's running within an acceptable time frame. If you're new to Orchestrator...yes. This does seem like a very roundabout way of scheduling. Just keep spending time in the product and this seeming disconnect of activities will make a great deal more sense.

Optional Steps, Adding a Check Schedule Activity to Ensure this Runbook only runs certain days of the week


Whoa whoa whoa. Where did you get Monday through Friday!? I don't have that.


 Finally, when you wire it up to the next activity (Get Object/Get Incidents to Resolve). You'll need to double click the arrow/link between them and set the following.


In doing this, we are in fact verifying the Check Schedule activity actually conforms to the schedule we care about. This is a hugely necessary step, otherwise you might as well not have the Check Schedule activity there in the first place!

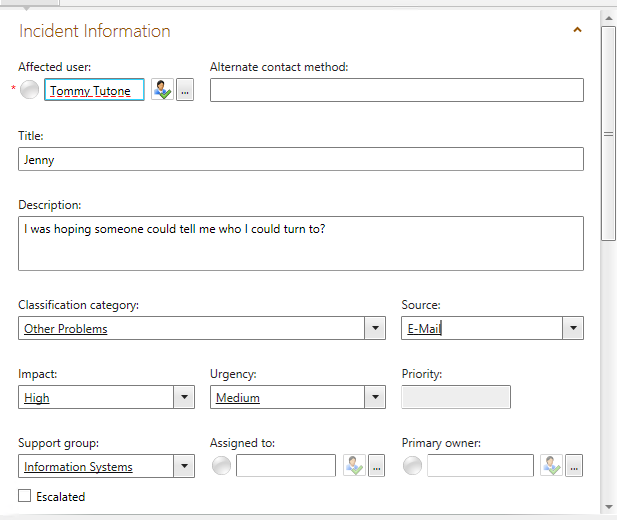
Next, we need to use Get Object which I'll name to "Get Incidents to Resolve". We'll connect to our Service Manager instance and filter incidents whose status is "Pending User Confirmation to Resolve". This activity will run once for every incident it finds. So if there are 12 Incidents in this status it will run 12 times.


Next, let's get our Affected User of the Incident. We'll do this by using a Get Relationship activity and another Get Object (renamed Get Affected User) immediately afterwards.


In our "Object Guid" text field for this Get Relationship activity, we'll right click and select Published Data. Then we'll select SC Object Guid from "Get Incidents to Resolve" in our previous step.


Now in our Get Affected User (Get Object) activity, we'll select the following. Our Class is Active Directory User (i.e. the Related Class of our Get Relationship activity). For our filter's we'll add one for SC Object Guid and set it equal to the Related Object Guid of the previous step. I put that in bold letters, because I want to draw attention to the very fine distinction between it and other similar sounding things in that last.


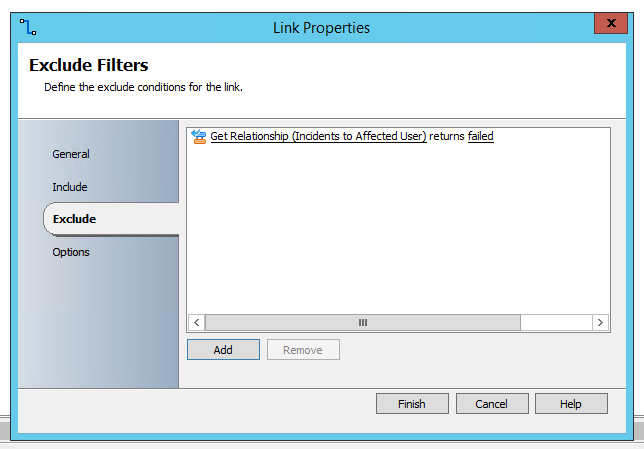
Finally, we need to return only Affected User from those Incidents. To ensure we'll only get the Affected Users and not "Created by" or "Assigned To" double click the arrow between Get Relationship and our Get Affected User activity. Then go to "Exclude" and hit the Add button.


 Now click on the text that was just added to the list and select Relationship Class.

 
Now change equals to does not equal and change value to Affected User. Then hit Finish.


So before we keep just hauling along, what have we done here exactly? Why was this step important? If you're new to Service Manager or Orchestrator, you may not frequently think about all the types of things stored in just an Incident. There is an Affected User (Active Directory User), there is an Assigned To user (Active Directory User), there is a...and the list goes on. Had we not added this step, we'd return all the related Active Directory User's as they relate to a single instance of an Incident. By using the Exclude tab, we can throw out all the users/relationships we don't want to appear downstream. This is important for the following step...

Our Get Object activity (renamed Get Affected User) will use a filter of SC Object Guid from the previous step. BUT! Since we told the previous step to only return user's whose class as it relates to the Incident is the Affected User - we know confidently that this activity, regardless of how many times it runs will always be the Affected User object's of the Incidents and nothing else.


Next, we'll do almost the same exact thing but instead for the Assigned To user. So grab a Get Relationship and Get Object and wire them up after Get Affected User. When you are wiring up this Get Relationship don't forget to get the SC Object Guid from the Get Incidents to Resolve step and not the previous step!


The only difference between the following and above steps is the Link between our new Get Relationship and Get Assigned To user, will be an exclude condition for "Relationship Class does not equal Assigned To User"


Again, immediately following our Get Relationship activity we'll have a Get Object that will be renamed Get Assigned To.


Next, we need to create a Text File for each one of the Incidents we need to evaluate to alert on. To do this, grab a Run .NET Script activity from System Activities. These text files will be created on the Orchestrator server so you may want to go create a directory for SCSM Automation tasks such as this one on Orchestrator's C: drive.

Ugh. Text files? Are you kidding me?

No. I'm not kidding you. This is one of those "Come on Orchestrator!" jabs I can't help but have because we'll be using this as a crutch for two things...
  1. SMLets while documented working within Orchestrator aren't perfect. I'm a huge fan of them, but since they are open source, it means you're on your own in terms of support and troubleshooting. Specifically, I tried them about 78 different ways in the eventual PowerShell script that is going to do the notification but the "-smobject" parameter always passes null. As a result we had to do all the building up until this point to get Assigned To, Affected User, etc.
  2. We need a way to store the Action Log (temporarily), sort, parse, and evaluate it. If this can be done in Orchestrator it is beyond me how it could be accomplished. So I'm moving to simply building the data I need, store it, do all my logic in a PowerShell script, and then delete files as I go within the script before a final "clean up" activity.
  3. Alright. I really seriously hate that it's 2015 and I've had to resort to text files for this. Also, it means this list 3 things instead of 2. Just...ugh. You know what. It's fine. It's fine. I'm moving on.

 Our Run .NET Script activity is a PowerShell file one liner.


Since I can't resize those windows, the PowerShell line I have is...
new-item c:\scsm\automation\requestResolutionConfirmation\{ID from "Get Incidents to Resolve"}-{UserName from "Get Affected User"} -ItemType file

Which means our file once created will have a file name like IR25083-dzaka.txt

So now we have text files, for every incident in this status, with the affected user's username in the title of the file separated by a hyphen. Next let's start writing the Action Log into the text files to do that it's time to Get Relationship.

Are you getting the hang of this yet?
 
Again, wire up to your Service Manager instance, define your Object Class as Incident, set the SC Object Guid equal to your "Get Incidents to Resolve" step from the beginning. Then set the Related Class to Trouble Ticket Action Log.

Then grab your Get Object next (renamed to "Get Action Log Items")


And of course once again, grab a filter property, set the SC Object Guid equal to the Related Object Guid from your previous Get Relationship (IR to Action Log) step.

Holy crap when is this over...

Don't worry, we're really close. That was step 9 out of 13 or 14 depending on if you had the extra Schedule activity at the beginning. Onto step 10! Format the Entered Date date of the Action Log.


Using the Format Date/Time Activity, we just take in the Entered Date as published data from the previous step of Get Action Log Items and change the Output Format to be MM-dd-yyyy.

NOTE: Do not change this output format unless you plan on also changing the format in the final PowerShell script!

Now in our penultimate step (Append Line), we're going to format the order of the data that is going to go into our text files we created a few steps back.


As you can see the order in the append line is...

1. Format Result from "Format Date/Time"
2. SC Object Guid from "Get Action Log Items"
3. Entered by from "Get Action Log Items"
4. Username from "Get Assigned To"

This text files contains NO SPACES and has comma separated values for the final step of PowerShell parsing. Ready? Because here's the script...


PowerShell Parsing, Just a Bit of Lead In
Again, as I opened this post I'm doing what I can in Orchestrator (setting up all my data) and then going to do the actual parsing/logic/notifying with raw PowerShell code. I've tried formatting this code the last several days now and it's...it's just really frustrating. So here's a link to the PS1 file on my TechNet page.

Since the TechNet article doesn't do much in the way of a description it's worth pointing out the following in the script...

Line 1: Edit to be your Orchestrator's server name
Lines 58-72: Service Manager stores the entered by value as domain\username. 3rd party companies such as Cireson store it as the display name. If you are leveraging multiple technologies I draw attention to this section so you can continue to do so!
Line 78: You will have to have your Support Tier groups as actual Active Directory groups in order to the match.
Line 81 + 87: This is the actual "Days Past" logic in action. Get creative here! 0 days past I did nothing. 1 day past I emailed...and then two days past you could email...
Line 105: Change to use your SMTP server

In summary, the script is parsing your Action Log text files trying to figure out the following...
1. Who was the last person to update the Action Log?
2. Was that person an Analyst or the Affected User?
3. If it was the Affected User, I won't take any action because they must have said something and the analyst didn't take it out of this special status yet
4. If it was an Analyst, I will take action because I'm assuming the analyst must be asking something since it's still in this status


The other thing that I'm personally divided on in this solution is who the email should come from? It could come from the scsm workflow account's email address that is used by your Exchange connector so when the Affected User hits reply it updates the Incident. Then again, it could be spoofed to come from the analyst so it looks like more of a personal touch/communication. In either scenario, the Exchange Connector would process the email assuming you put your scsm workflow account's email address in the CC field. Since the only match it does is the FROM SMTP address field it's your call. Get creative!


In Closing...
I hope SOMEONE found this helpful!