
I've been working on this post for awhile, because the first two posts are relatively straight forward in comparison (here's Part 1 and Part 2). In addition, there are a few posts out there that while walking you through this (new) employee scenario don't answer some fundamental issues such as...
- Dynamically placing a user in an Organizational Unit within Active Directory
- Dynamically creating a username based on username availability
- Add the new user to multiple groups
- The post would be crazily lengthy (like this one is about to be) because it can't possibly cover all the variables you'd want to take advantage of in your respective organization
- With point one made, for the sake of brevity the posts are addressing the core question of - How do you create a user through Service Manager and Orchestrator?
Let's Go Get that Service Request in Orchestrator
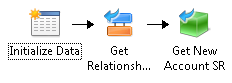
First thing's first. We need to start building the runbook that is going to parse our custom Service Request class we've been building so as to create an employee within Active Directory. To do this we'll start with three core activities.
- Initialize Data (runbook control activity)
- Get Relationship (service manager activity)
- Get Object (service manager activity
- Initialize Data
- Get Relationship (Runbook to Service Request)
- Get New Hire Account SR
Here's how we'll configure each of the activities:
Initialize Data
 | ||
Change Parameter 1 to "ActivityGUID"
Get Relationship (Runbook to Service Request)
|

- Change your Connection to your Service Manager system. This is defined through Orchestrator -> Options -> SC 2012 Service Manager. Mine is just called Service Manager, if you manage multiple environment you have/want multiple connectors like "Production" and/or "Development"
- The Object Class will be set to Runbook Automation Activity
- The Object GUID is published data from the previous step. Right click in this text area, select Published Data and pick ActivityGUID from the previous step
- Related Class is the class we've been creating. I called mine "Service Request, Human Resources". Now you may see why! Because I know in the possibly giant list of class to pick from exactly where to find the class I made. It's a normal Service Request + my HR customizations. Just easy for alphabetical sorting is all.
When it comes to Service Manager and Orchestrator (if you've never done this before), is we keep bouncing back n forth between one object in the system to another. This is commonly expressed through the use of the "Get Relationship" activity which we'll be using quite a bit. Another way to think about this is an Incident. An incident has a title, but it has relationships to Active Directory users. Like Created By, Affected User, Assigned To, Related Configuration Items, etc. The use of the "Get Relationship" activity will become increasingly clearer as we move through this and other requests.
Alright so we have the basis for this thing setup. When the runbook executes from within Service Manager, it will call Orchestrator and figure out the relationship between itself and it's parent Service Request. So right now we're just querying data. That's all it will do!
Let's Go Get an Available Username
Next, we'll need to build a username for our new user. But I want to get a little creative and scour Active Directory first for availability before continuing on in my runbook and possibly shooting myself in the foot downstream. To do so, we're going to turn to our trusty friend PowerShell so head over to System Activites and grab a "Run .NET Script"

Once you open it up, change the Type to PowerShell. Then use the following code (forgive the formatting, blame Google):
$session = New-PSSession -ComputerName YOURORCHESTRATORSERVERHERE
$result = Invoke-Command -session $session -ScriptBlock {
$firstName = "Published Data - NewHire First Name"
$firstName = (get-culture).TextInfo.ToTitleCase($firstName.ToLower())
$lastName = "Published Data - NewHire Last Name"
$lastName = (get-culture).TextInfo.ToTitleCase($lastName.ToLower())
$fnLength = $firstName.Length
if (($lastName.IndexOf("'") -ne -1)
{$lastName = $lastName.Replace("'", "")}elseif (($lastName.IndexOf("-") -ne -1)){$lastName = $lastName.Replace("-", "")}elseif (($lastName.IndexOf(".") -ne -1)){$lastName = $lastName.Replace(".", "")}else{$lastName = $lastName}$x = 1
while (($x -le $fnLength))
{$username = $lastName + $firstName.Substring(0,$x)try
{# A user was found. Lame.$U = Get-ADUser $username -ErrorAction Stop
}catch [Microsoft.ActiveDirectory.Management.ADIdentityNotFoundException]{# The user was not found! We're using this one!break
}$x++}new-object pscustomobject –property @{username = $username
}}$availableUsername = $result.username
If you're new to using PowerShell within Orchestrator - there are a few issues you'll bump into that are not worth flipping tables over. Especially in the getting started phase! So let's clear something up first.
PowerShell through the eyes of Orchestrator is a 32bit process running PowerShell version 2
That means things you probably take for granted like "Get-ADUser" and other necessary commands aren't available. BUT! There is a way around it and it's featured above. Since PowerShell v2, 32bit isn't capable of the above I just wrapped the entire script inside of another script. A script that runs on the local Orchestrator server running Server 2012r2 with 64 bit, PowerShell 4. Woot! Hence the funky bit on the end of the script where we take the available username we found, publish it from Orchestrator's Server, back onto the 32 bit Orchestrator databus, and thus in turn a variable we can make use of downstream in our runbook. Yes. It's annoying. That's all there is to say about that. Back to the script!
You'll have to change three variables in the above script. First, you'll have to change it to the name of your Orchestrator server. Next, you'll have select Published Data from your Get New Account SR for your first and last name. I also from the start of the script take into account possible grammar mistakes for someone typing the new hire's name in. So someone can't type ADAM DZAK and that's how the account get's created. It all gets formatted to lowercase, then uppercase the first letter in each word. In the lines following I account for the potential ridiculousness of naming consistency in an Active Directory environment by removing apostrophes, extra periods, hyphens, etc. Obviously you don't have to use these, but when it comes to usernames I wouldn't mind some consistency. Secondly, the username is getting formatted like Last Name + First Letter of First name. So if I ran this script against myself I'd get dzaka. On the next pass I'd get dzakad. Etc. Etc. As you can see it doesn't take much to rework this part to your needs.
Finally I make sure this Run .NET Script Publishes data to consume in the "Create User" activity for Active Directory:

Update our Service Request
I end up doing this a lot in my SR, but now that we have the username we can update the "Employee Username" property. It's really simple. Just use a "Update Object" activity. Select the Class as "Service Request, Human Resources" (or whatever you called your class) and grab the "Employee Username" property and update it with Published Data from "Get Available Username"

Let's Get the Manager
I know we haven't built the Request Offering yet, but here's how we'll configure our Runbook to get the manager from the Service Request. We'll use two activities to do this, Get Relationship and Get Object.

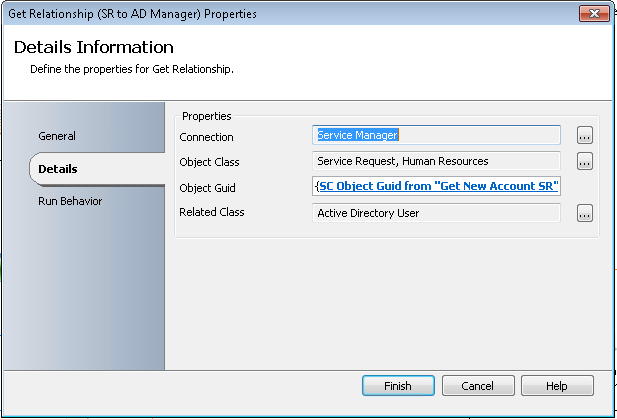
To configure these activities, let's start with Get Relationship (SR to AD Manager). Use your Service Manager Connection you used originally, define the Source Class as "Service Request, Human Resources", the Object GUID is the SC Object GUID of Get New Account SR. The Related Class is Active Directory User.
Next, the link between both will get the following exclude treatment. Just double click the arrow between both to bring up this menu.
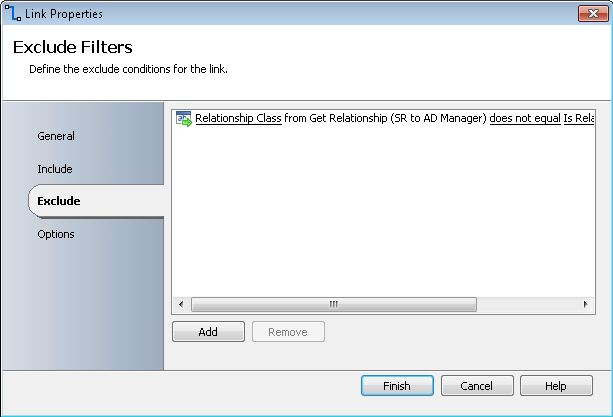
In the Link properties, head to the "Exclude" menu and change it to contain the above. Relationship Class from Get Relationship (SR to AD Manager) does not equal Is Related to Configuration Item. What we've done here is say "Get me all Active Directory users that are related to the Service Request, but only get me the ones that are 'Is Related to Configuration Item'"
Let's dissect this a bit. A Service Request will have a few users associated to it upon submission. Created By and Affected User. When we build our Request Offering to allow the selection of a manager, we'll store that selection in the "Related Configuration Items" tab of the Service Request. Bringing the total Active Directory users related to the SR to 3. This above link lets us uniquely identify this Relationship and pass the singular object (user) into the next activity of Get Object. So instead of 3 users, we only get 1.
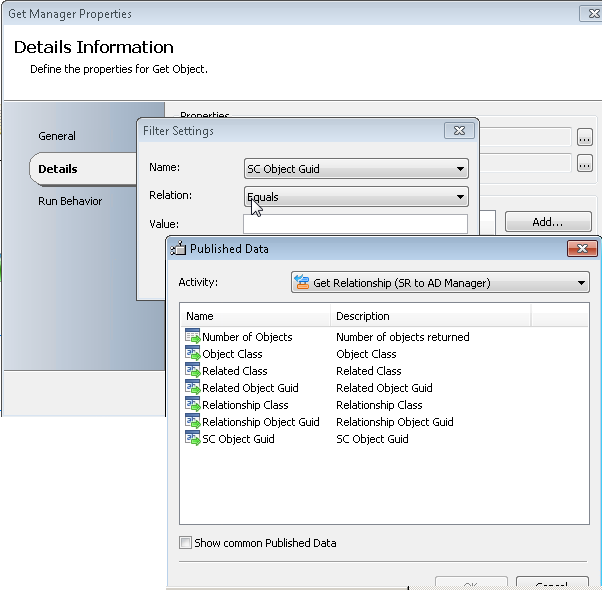
Finally, let's grab the Manager object. We do this simply using "Add" selecting "SC Object Guid" and using the published data of our previous "Get Relationship" step. We do this by selecting the "Related Object Guid"

I want to repeat that because it bears repeating. "Related Object Guid" not to be confused with the other ones.
If you've made it this far, here's what the runbook should look like by now.

When you think about it, we have pretty much everything we need to build our employee. We have the all the employee properties stored in the Get New Account SR, we have the username from our Get Available Username PowerShell script, and we have the manager stored away in the Get Manager object.
Neat. What about the OU?
I have one guess as to why the OU topic isn't tackled elsewhere, because it requires more PowerShell. Well I could be wrong. But it's the way that makes the most sense to me.
You'll need to create a custom PowerShell script that takes the selected "Department" value and translates that somehow into an OU match.
This is where you need to have some Active Directory planning in mind plus an idea of how you are going to add items to your Department's List in SCSM that you created in Part 1 of this blog series. Let's say you have a Department List in Service Manager that looks something like...
- Administration
- Accounting
- Information Technology
- Developers
- Human Resources
Here's what I'm getting at. You'll need a PowerShell script that essentially does the following. So grab a .NET Script, wire it up after your Get Manager activity, and rename it to something descriptive. Such as Get OU to Place, then via its Published Data, you publish out the variable myOUPath. This variable is then ultimately used in the "Create User" Active Directory activity. Since we are just playing with strings in the script, we don't need to use 64bit PowerShell on our Orchestrator server.
$department = "Published Data - NewHire Department"However with the above said, this means all the departments in your Departments List must be uniquely named for the purposes of this Get OU to Place script. Personally I don't see the drawback to this because I can't envision where a company would have two departments with the same name. BUT! Even if they did, all you'd have to do is rename the department in the list to have a bit more clarity and then problem solved. For example, if you had two departments called "Developers" you just change the name in the list to "Developers for IT" and "Developers for Accounting" as child items underneath each. Whichever he case, I'm open to suggestion here. However it's how I'm going to continue along in this runbook building my employee for dynamic OU placement.
if ($department -eq "Accounting")
{
$myOUPath = "OU=Accounting,DC=domain,DC=com"}
elseif ($department -eq "Developers"){
$myOUPath = "OU=Developers,OU=Information Technology,DC=domain,DC=com"}
What about their password?
A few ways to accomplish this, but it has nothing to do with custom PowerShell code!
- Statically define it in the Create User activity.
- Your security folks probably won't like this
- If you need to change it, you need to check out the runbook. Not ideal either
- Statically define it in the Create User activity and add some dynamic value
- Dynamically define the whole thing

When it comes to the Create User activity, we just use this activities Published Data to set the password. Now how you choose to share the password is up to you and all sorts of interpretation. Here's a really quick, no real extra work in Orchestrator thing you can do...
- Use a "Send Email" activity to email the manager (which you have by now) the new user's password
- Write it out to a file somewhere that only certain people have access to on your network
Finally, the moment you've been waiting for
Let's drop the Create User activity into our runbook. Wire it up and start pulling out the following properties:
- Common Name
- Department
- First Name
- Last Name
- Manager
- Container Distinguished Name
- Password
- Title
- User Principal Name
- Change Password at Next Logon
- Common Name - CN={EmployeeFirstName from Get New Account SR EmployeeLastName from Get New Account SR}
- Department - EmployeeDepartment from Get New Account SR
- First Name - EmployeeFirstName from Get New Account SR
- Last Name - EmployeeLastName from Get New Account SR
- Manager - Distinguished Name from Get Manager
- Container Distinguished Name - myOUPath from Get OU to Place
- Password - Published Data from Generate Random Text
- Title - EmployeeTitle from Get New Account SR
- Sam Account Name - availableUserName from Get Available UserName
- Change Password at Next Logon - true
The last step is to grab Enable User from the Active Directory activities and feed it the Distinguished Name published data from the Create User activity.
BOOM! You got a user created.
Add the User to Groups...with an s
I know there is a "Add to Group" activity within the Active Directory activities, but it's only one group! I can only add a single group?! One group?! What good is that? What if they are in different departments? This will always be different! To PowerShell!
Much like the Find OU to Place PowerShell script, we need to do something similar with dynamically adding certain groups based on the...you guessed it... Department value as picked from the Department List.
$department = "Published Data - NewHire Department"
$samAccountName = "Publishd Data - Create User Sam Account Name"
if ($department -eq "Accounting")
{
Add-ADGroupMember -Identity "accounting group" -Members $samAccountName
Add-ADGroupMember -Identity "this other group" -Members $samAccountName
Add-ADGroupMember -Identity "some other group" -Members $samAccountName
}
elseif ($department -eq "Developers")
{
Add-ADGroupMember -Identity "accounting group" -Members $samAccountName
Add-ADGroupMember -Identity "this other group" -Members $samAccountName
Add-ADGroupMember -Identity "some other group" -Members $samAccountName
}
Now, this is messy. I'll grant you that. If you have a lot of departments, then you have a lot of PowerShell code to account for all the scenarios. It certainly gets the job done, but as you can see could become unmanageable.
BUT! I like it because it means I have a single place to edit the default groups that users get when they are created or switch departments (the Service Request, Human Resources request that we've be building here if you haven't already surmised would lend itself really well to the idea of automatically transferring departments. You could use the same lists, the same scripts, etc.) So there are a bit of two sides to this and you can probably guess where I fall.
Don't forget, if you go this route you'll have to wrap it inside a 64 bit PowerShell script. That said the above becomes the following:
$session = New-PSSession -ComputerName YOURORCHESTRATORSERVERHERE
$result = Invoke-Command -session $session -ScriptBlock {
$department = "Published Data - NewHire Department"
$samAccountName = "Publishd Data - Create User Sam Account Name"
if ($department -eq "Accounting")
{
Add-ADGroupMember -Identity "accounting group" -Members $samAccountName
Add-ADGroupMember -Identity "this other group" -Members $samAccountName
Add-ADGroupMember -Identity "some other group" -Members $samAccountName
}
elseif ($department -eq "Developers")
{
Add-ADGroupMember -Identity "accounting group" -Members $samAccountName
Add-ADGroupMember -Identity "this other group" -Members $samAccountName
Add-ADGroupMember -Identity "some other group" -Members $samAccountName
}
}
Again, replace the Orchestrator server with your Orchestrator server's name. However unlike Find OU to Place you'll notice we aren't publishing any data back onto Orchestrator's databus so that step isn't used.
Whew. Alright. That's that. Next post we'll wrap this entire thing by building the Request Offering that we'll present to end users on the Service Manager portal.
Any questions so far? Need help with something? Find me on TechNet or Twitter.
Part 4 is here
should I be running any of these flattened? My runbook is running some of these several times
ReplyDeleteFound it... I needed to filter the Get New Hire Account SR - SC Object GUID = Related Object Guid from "Get Relationship (Runbook to Service Request)"
DeleteWhen I create a request offering based off this service request the Map prompts to properties section does not let me map my a prompt to the new Manager relationship. How can I get this to work?
ReplyDeleteHey there Charles. Since this is relationship, it's not a property you can "map" like you could with text, numbers, dates, etc. So it of course begs the question "the how in the heck do you do it?!" The answer is really simple but easily overlooked - the user prompt for "Pick a Manager" is a Query Selection. The last step of configuring a query selction is to pick where you are going to map that (i.e. a related configuration item on the Service Request).
ReplyDeleteIn doing so, you overcome the issue in that it can't be set via the typical "user mapping" process" in a request offering.